Site Builders can Build Custom Joomla Components
If you are a professional site builder, but not a professional developer, then you have likely wished you could quickly build custom Joomla! extensions that would allow you to collect exactly the data needed, presented in the precise manner, as required by your client.
Building a Joomla Component can be a very complex undertaking, requiring knowledge of the Joomla API, MVC patterns, MySQL, PHP, error handling, and so on. For that reason, most site builders don’t even entertain the thought of custom component development but instead head to the Joomla Extensions Directory to configure and adapt existing components for their site development needs.
Today, all of that is changing. Tools like JFoobar eliminate the need to master advanced coding skills by automating the component build process and therefore make it feasible for non-developers to deliver components which customize data, parameter, and layout development.
This article will help you get started building custom components so that you can begin to unleash the power of the framework and build high-end custom websites with Joomla.
Install
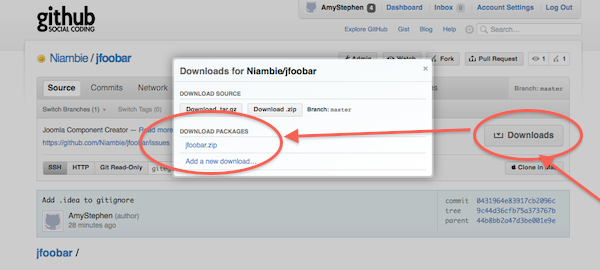
To begin, download JFoobar from Github.
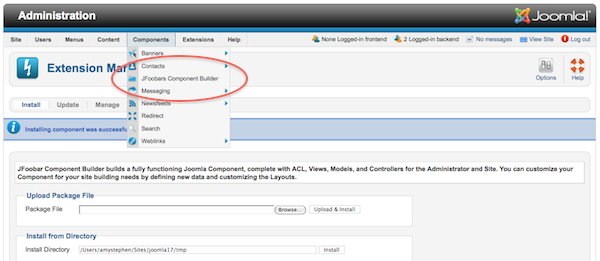
Next, install JFoobar, just as you would any other Joomla Extension.
Create
After installing, select the Menu Option Components-JFoobar Component Builder in the Administrator. You will be presented with instructions on how to proceed.

Creating a component is very simple. Select a name for your component that allows both a plural and singular form, use those values in the link and paste the URL into the Browser address bar. JFoobar will create your component and take you there.
option=com_jfoobar&singular=cat&plural=cats
Before going further, it’s worth noting that you can create as many components, as desired. When you are done creating components, you can uninstall JFoobar and your components will remain. JFoobar components are like any other Joomla component and can be uninstalled normally.
Review
Okay, so what do you have after you have created a Component using JFoobar? You’ll be happy to know that a fully functioning component is available. JFoobar handles all of the heavy lifting involved in creating Joomla Components.
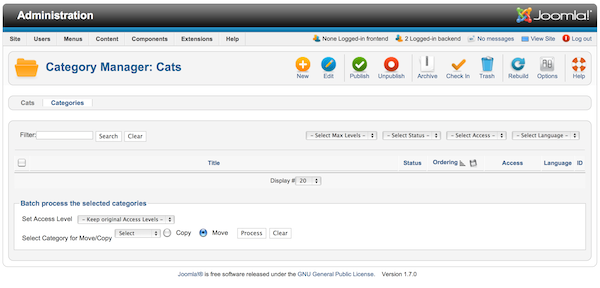
A Table is created, named after your component. The Category Editor and Manager are in place. The Title, Icons, Menu, Submenu, Button Bar and Filters are all created for you, as is the Batch process interface. All of the create and edit code has been written and will not need to be changed.
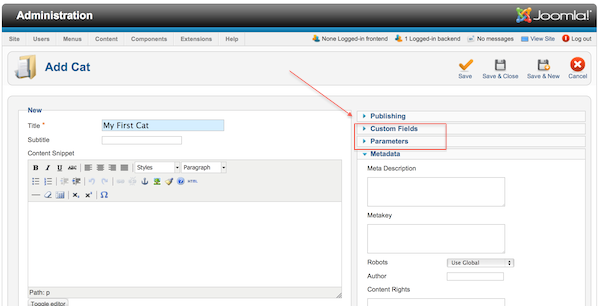
The Item Editor is also automatically created. You can create and edit items. At the bottom of the page, you will find the ACL grid, already programmed to work with your component.
Make special note of the Custom Fields and Parameter Sliders on the right side of the Editor. That is where the potential of this approach starts to show...you can customize your Custom Fields and Parameters — and those values will automatically appear in these areas.
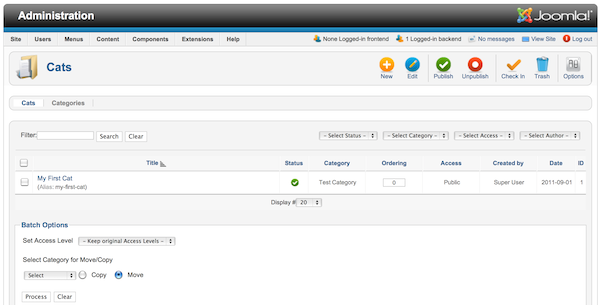
The Item Manager list is ready for use. All of the code needed to publish, check-in, archive, trash, move, copy, sort and display, etc., has been written for you. Click on the Options button to see that functionality ready to use.
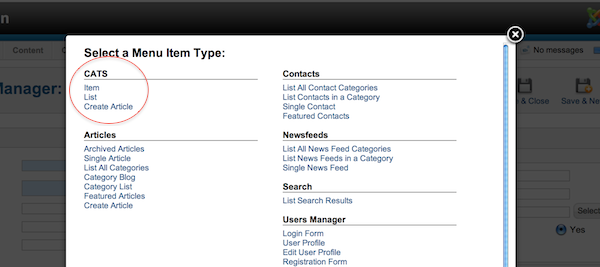
Three Site Views (Menu Items) are available. The List, Item, and Form Views are already coded and usable in the Menu Manager. Create a Menu Item for each and view the results from the site. (Make certain you have created a few sample items, first, of course.) The router code is written and the View and Action ACL is functioning, too.
Custom Component
Okay, so how do you make your component collect and display the data you need? This is where the benefits come in. By using Custom Fields, Parameters, and Layouts, you can tailor fit this Component for even the most challenging site engagements.
To get started, make certain you have good tools that allow you to edit PHP files. I recommend an IDE like PhpStorm (reasonably priced) or Eclipse (free). Instructions for how to install and configure those tools are readily available, although you might find instructions are not needed.
Administrator Media
The Joomla Administrator uses an icon for the Menu Item and Component Title area. You can customize the icons used by modifying the values in the media/NAMEOFYOURCOMPONENT area. To change the icons, you might have to change both image files and the CSS.
Component Table
As stated earlier, JFoobar automatically creates a table named after your component. The table has all of the standard fields that Joomla needs, including id, title, catid, state, created, publish up, and so on.
In addition, there are two fields that are used to store customizations: custom_fields and parameters. You will not have to change the table structure or the model code needed to save and display table information. You will only change a single XML file to customize your data.
Custom Fields
In order to create custom fields, you update the XML file named YOURCOMPONENTNAME.xml located at administrator/components/com_YOURCOMPONENTNAME/models/forms/. After making changes, copy the XML file to YOURCOMPONENTNAME.xml located at components/com_YOURCOMPONENTNAME/models/forms/.
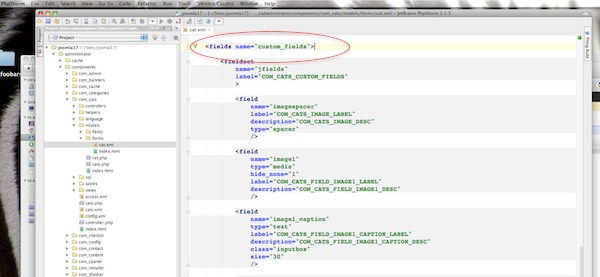
To begin, open the file and scroll down until you find
Although XML looks intimidating, it’s really not that complicated. Using the following example, you can get a good understanding for what a field definition involves: the name field will be used to display the form and to display the field contents in the layout.
<field
    name="image1"
    type="media"
    hide_none="1"
    label="COM_CATS_FIELD_IMAGE1_LABEL"
    description="COM_CATS_FIELD_IMAGE1_DESC"
    />
This example field has a media field type. That means a text field to hold the file name and a button to present a file dialog box will appear on the form for this field.
Each fieldtype is different. Joomla core has 40 field types defined on the Joomla Documentation Wiki. You can copy the Wiki examples into the XML file and make the minor changes needed. You can even create a custom field type, if necessary.
Add a few fields and then see how the “Custom Fields” portion of the Form Editor automatically reflects your changes. Simple, huh?
Language Files
The other notable set of attributes are the label and description attributes. The values for those attributes are expressed as language strings and are stored in the language files found in administrator/components/com_YOURCOMPONENTNAME/language/xx-XX/ files.You can change those language strings so the information is exactly what you need displayed on the forms for your client.
Parameters
Parameters can be used in your Layouts to make decisions on how you want to display your data. If you add matching parameters to the Component Options and the Menu Item XML, then the Global defaults will be available. Likely, you will find your need for parameters is greatly reduced since you can customize the component to fit your specific needs.
In order to create parameters, you update the same XML file where you defined your custom fields. This time, look for the Parameters
<fields name="parameters">
    <fieldset
       name="jbasic"
       label="COM_CATS_FIELD_PARAMETERS_LABEL"
       >
       <field
           name="cat_layout"
           type="componentlayout"
           label="COM_CATS_FIELD_ALT_LAYOUT_LABEL"
           description="COM_CATS_FIELD_ALT_LAYOUT_DESC"
           extension="com_cats"
           view="cat"
           useglobal="true"
       />
    </fieldset>
</fields>
Use the same approaches with parameters as was described for custom fields.The Parameter Slider in the form editor automatically reflectd changes you make.
If you want to change the Parameters for the Component, update the config.xml file in the root of your Administrator Component.
To change the Menu Item Parameters, update the site tmpl/layout.xml file in your site component.
To ensure these three sets of values work together, get into a habit of changing the XML file above and then copying the parameter section to the other two locations.
Customize Layouts
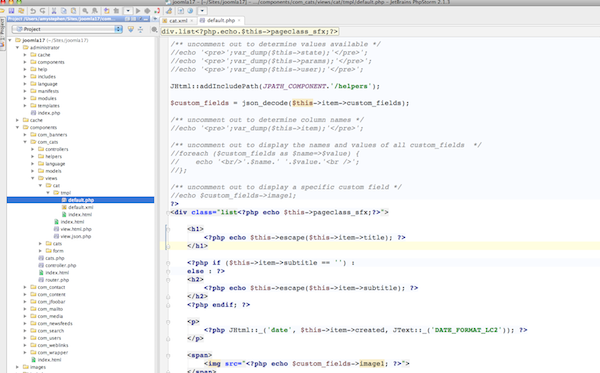
Once you have customized the data you want to collect and the parameters you need for decision making, the last step is to customize the layouts.
If you have used layout overrides before, then this work will be familiar. Just look at the layout files in the site component and adapt those files, as needed. Although Template layout overrides work with JFoobar components, you will likely find you won’t need to use that approach since you can customize the component layouts instead.
In the layouts, there are lines of code that you can un-comment out in order to review the names of columns available. Also, the iteration process (looping) is already in place for the list view. Just focus on getting the HTML the way you need and then inserting the data elements. Experiment, you can always throw away your component and quickly create a new one. The more you try things out, the more productive you will become, and the better able you will be to craft the output exactly as your design requires.
Closing
When I started learning how to code, I began to see first hand that the Joomla framework holds a great deal of promise. I started calling it the creamy inside of the chocolate Joomla cookie. Making it easier for those who do not code to also be able to customize components is a goal I have had for a long time. If you are a site builder, I encourage you to trust yourself to learn new skills, like those described in this article. In doing so, you will find flexibility needed to customize Joomla for high-end, beautiful and functional site development.
If you have questions or find issues with JFoobar, please use the Issues resource. You are encouraged to fork JFoobar, fix bugs and add features, and then issue a pull request to share those improvements with others.
Happy Birthday, Joomla! 
Some articles published on the Joomla Community Magazine represent the personal opinion or experience of the Author on the specific topic and might not be aligned to the official position of the Joomla Project
By accepting you will be accessing a service provided by a third-party external to https://magazine.joomla.net.cn/

Comments